 Pin It
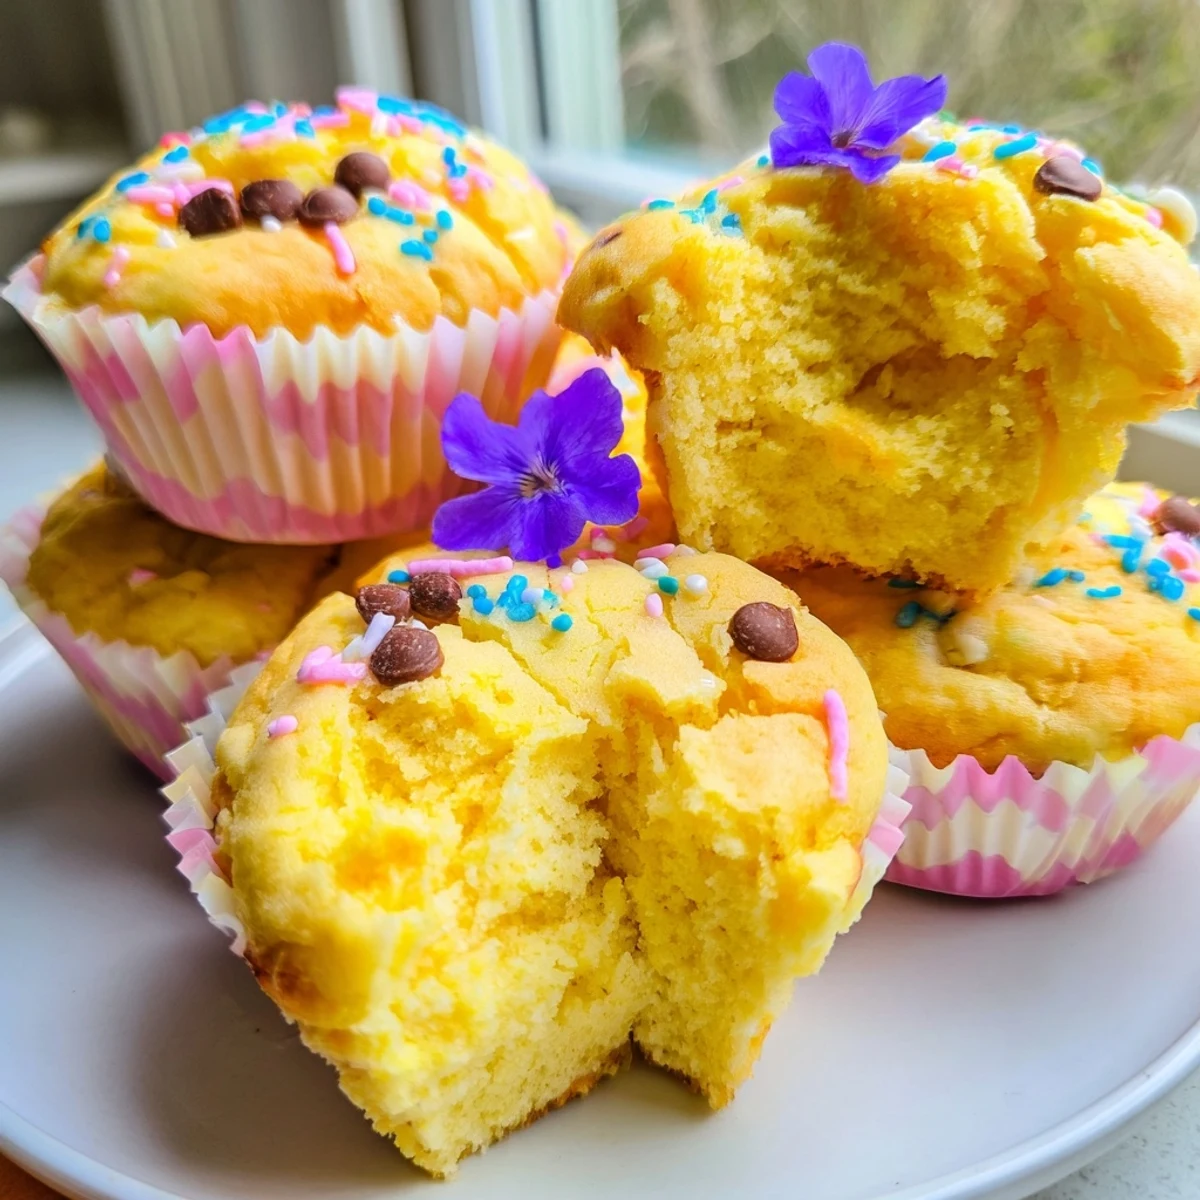
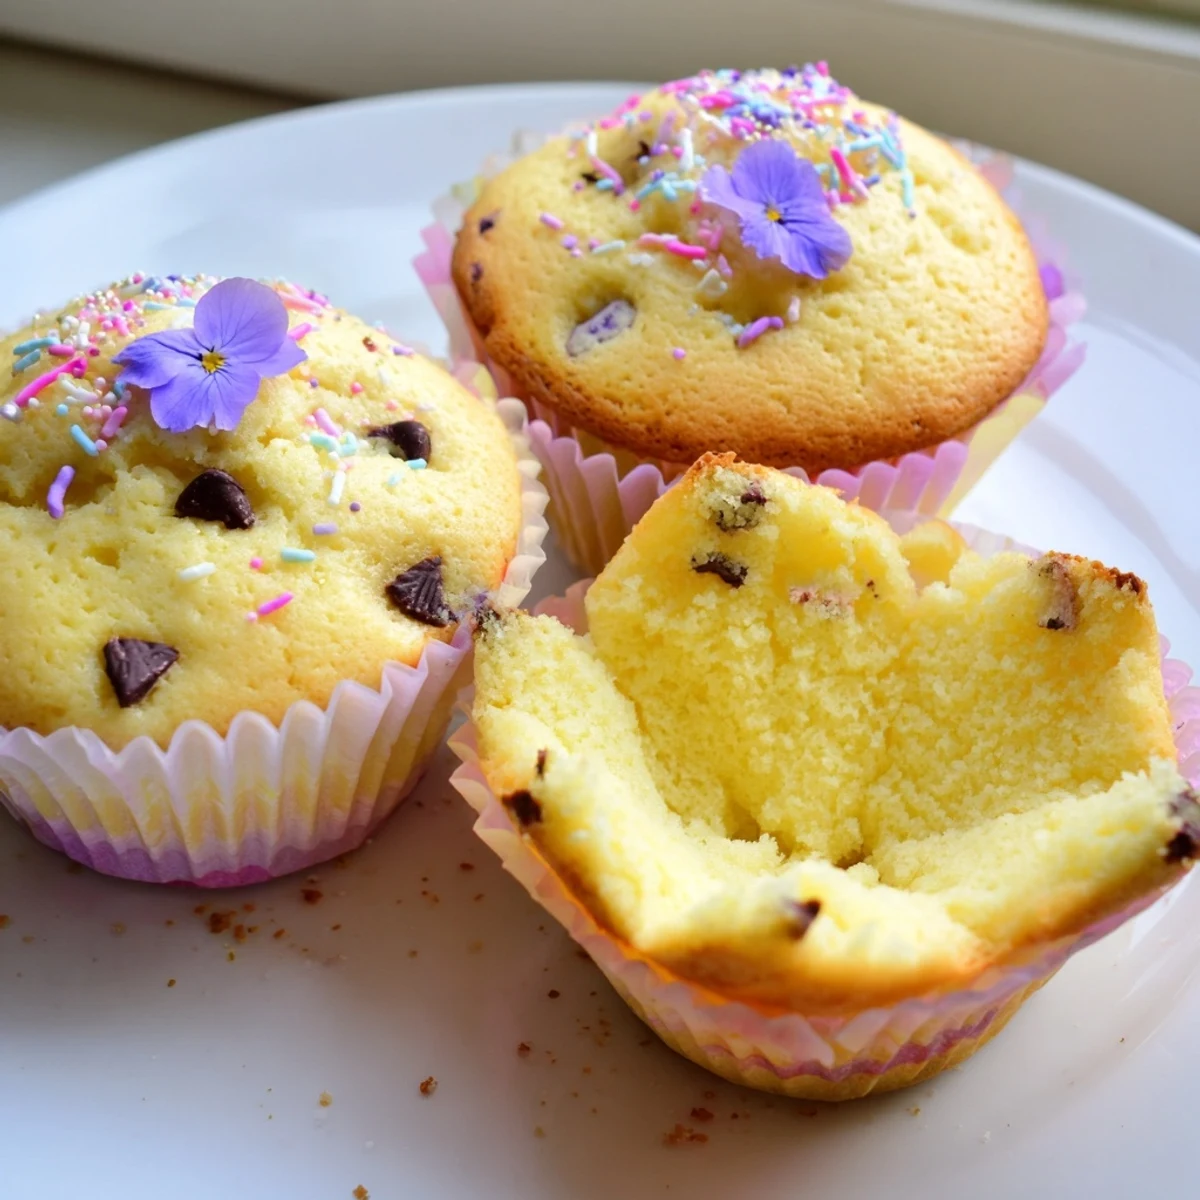
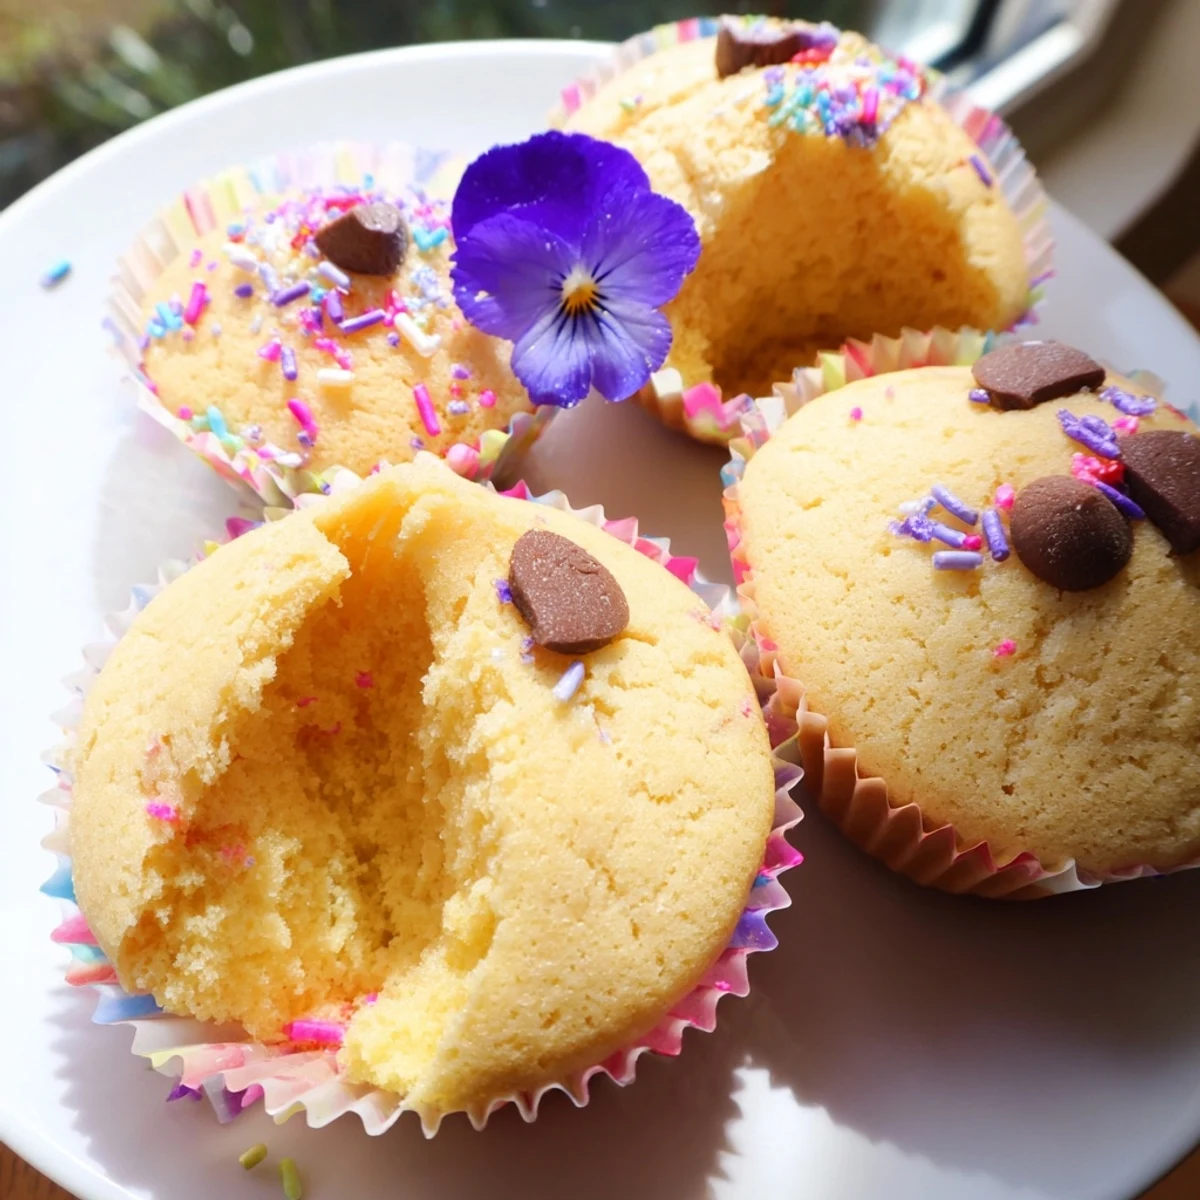
 These tender steamed cupcakes feature a signature cracked "blooming" top and incredibly moist texture. The stovetop method creates perfectly fluffy treats without any oven required—ideal for quick desserts or when baking equipment isn't available.
Each cupcake emerges with a delicate crumb and subtle vanilla flavor, while the steaming technique ensures consistent moisture throughout. The batter comes together in minutes and steams in just 12–15 minutes, yielding eight beautifully risen treats.
Customize with natural food colorings, citrus zest, or your favorite extracts. Top with sprinkles, edible flowers, or chocolate chips for an elegant finish perfect for gatherings or everyday treats.
Rainy season in my college dorm meant one thing: no oven access but endless dessert cravings. I discovered steamed cupcakes completely by accident when my microwave broke and desperation led me to a bamboo steamer forgotten in the back of a cupboard. Watching those first cupcakes rise and crack open like tiny flowers in the steam felt like discovering magic.
My roommate walked in mid-steam and asked why I was making dumplings for dessert. Her face when she bit into that fluffy, vanilla scented cupcake was absolute confusion followed by immediate delight. Now whenever storms knock out our power or were just feeling too lazy to heat up the big oven, we steam a batch and watch them bloom through the glass lid.
Ingredients
- All-purpose flour: The structure builder here; spoon and level it gently instead of scooping directly to keep these tender
- Baking powder and baking soda: Both leavening agents work together to create that signature cracked blooming top as they react with steam
- Salt: Just a pinch wakes up all the other flavors and balances the sweetness
- Granulated sugar: Cream this thoroughly with eggs to create the airy structure that helps cupcakes rise
- Room temperature eggs: Crucial for proper emulsification; cold eggs can cause the batter to seize or separate
- Whole milk: Adds richness and helps create that tender, velvety crumb structure
- Melted unsalted butter: Using melted butter instead of softened creates a denser, more moist texture perfect for steaming
- Vanilla extract: Pure vanilla makes all the difference here; the gentle heat of steaming really highlights its flavor
- Food coloring: Gel coloring works best without thinning the batter, but liquid works too if you adjust the liquid slightly
Instructions
- Get your steamer ready:
- Fill your steamer with water and bring it to a gentle simmer while you prepare the batter. Line your cupcake molds with paper liners and set them near your workstation.
- Whisk the dry ingredients together:
- In a medium bowl, combine the flour, baking powder, baking soda, and salt. Whisk them together thoroughly so the leavening is evenly distributed throughout the flour.
- Cream the eggs and sugar:
- Beat the eggs and sugar in a large bowl until the mixture turns pale and noticeably thicker, about 3-4 minutes by hand or 2 minutes with an electric mixer. This step creates the structure for those beautiful blooming tops.
- Add the wet ingredients:
- Pour in the milk, melted butter, and vanilla extract, mixing well after each addition. The mixture should look smooth and glossy before you move to the next step.
- Fold in the flour mixture:
- Gently add the dry ingredients in three parts, folding with a spatula until just combined. Stop as soon as you no longer see dry flour streaks; overmixing will make these tough instead of tender.
- Add your colors:
- Divide the batter if you want multiple colors and gently fold in food coloring. Layer the colored batters in your molds or swirl them lightly for a marbled effect.
- Fill the cupcake molds:
- Spoon the batter into prepared liners, filling each about three quarters full. The cupcakes need this headspace to rise and bloom properly in the steam.
- Steam with care:
- Place the molds in your steamer with space between them for circulation. Cover the steamer lid with a clean kitchen towel to catch condensation that would otherwise drip onto the cupcakes and make them soggy.
- Let them bloom:
- Steam over medium heat for 12-15 minutes until a toothpick comes out clean and the tops have cracked open beautifully. Resist lifting the lid too early or the sudden temperature change can cause them to collapse.
- Cool and decorate:
- Remove from heat and let the cupcakes cool in the molds for about 5 minutes before transferring to a rack. Decorate with sprinkles, edible flowers, or chocolate chips while they are still slightly warm so the toppings stick.
 Pin It
 Last spring I made these for my nieces birthday party and they were so fascinated watching the cupcakes transform through the clear glass lid. The blooming tops reminded them of actual flowers opening, which sparked an entire afternoon of kitchen garden pretend play.
Making Them Your Own
The basic vanilla batter is incredibly forgiving and adaptable. I have added citrus zest, swapped in coconut milk, or folded in mashed banana for completely different flavor profiles while keeping the same reliable method.
Natural Coloring Options
Pastel colors feel right for the delicate texture of steamed cakes. Matcha powder creates soft greens, beet powder yields gentle pinks, and a pinch of turmeric gives sunny yellow without any artificial aftertaste.
Storage And Make Ahead Tips
These cupcakes actually taste better the next day as the moisture redistributes throughout the crumb. Store them in an airtight container at room temperature for up to 2 days, wrapping individually if you need to stack them.
- Freeze undecorated cupcakes for up to a month and thaw at room temperature before decorating
- Refrigerate decorated cupcakes if you use perishable toppings, but bring them to room temperature before serving
- Revive slightly stale cupcakes by steaming them for 30 seconds; they will perk right back up
 Pin It
 There is something so satisfying about creating beautiful desserts with the simplest equipment. These blooming cupcakes taught me that you do not need fancy appliances to make something magical.
Recipe FAQ
- → Why do these cupcakes develop a blooming top while steaming?
-
The steam creates rapid, even heat distribution that causes the batter to rise quickly and crack open beautifully. This natural blooming effect occurs as moisture escapes during cooking, creating those signature cracks while keeping the interior exceptionally tender and moist.
- → Can I make these without a traditional steamer setup?
-
Yes! Place a heat-proof bowl or rack inside a large pot with simmering water. Ensure the water level stays below your cupcake molds, and cover with a tight-fitting lid wrapped in a kitchen cloth to catch condensation drips.
- → What's the best way to achieve vibrant colors in the blooming pattern?
-
Use gel food coloring for concentrated hues without thinning the batter. Divide the mixture and tint each portion separately, then layer or swirl gently in the molds. Natural options like matcha powder, beet juice, or butterfly pea flower tea work beautifully too.
- → How should I store these steamed cupcakes?
-
Keep in an airtight container at room temperature for up to two days. For longer storage, refrigerate for up to five days—they actually retain moisture better than baked cupcakes! Bring to room temperature before serving for the best texture.
- → Can I substitute ingredients for dietary restrictions?
-
Absolutely. Swap all-purpose flour for a 1:1 gluten-free blend, use plant-based milk, and replace eggs with flax or chia eggs. Vegan butter or coconut oil works perfectly in place of dairy butter. The steaming method remains consistent across most substitutions.